
Author: Guy Shepherd
One of the most common requirements is to run a Python script before or after a Mo.net projection, perhaps to run an existing Python script as part of an end-to-end modelling activity, prepare some data for a projection task, or process some results of a projection task.
This is easily accomplished in Mo.net either as a group projection task or by developing a small reusable component.
In this example I will show how to run an existing Python-based Black Scholes model from a Mo.net group projection task, passing in arguments to define the vector size to use, and retrieving the completion message & run time from the Python script.
Environmental Configuration
The example illustrated here uses out-of-the-box installations of both Mo.net Model Development Studio and Python:
- Mo.net Model Development Studio (Standard, Professional or Enterprise) v7.0 or later
- Python 3.5 or later
Black Scholes Model
The Black Scholes Python script is shown below. This is saved as vector-black-scholes-standard-terms-with-parms.py in the Python folder of the Mo.net project.
import time
from datetime import datetime
import numpy as np
from scipy.stats import norm
import sys

# S = current stock price
# K = option strike price
# P = theoretical put premium
# s = standard deviation of returns
# r = risk free rate (assumed zero for this example)
# t = time until option matures

if len (sys.argv) == 1 :
    xx=720
    yy=5000
    print('Using default vector size: ',xx,yy)
else:
    xx=int(sys.argv[1])
    yy=int(sys.argv[2])
    print('Using custom vector size: ',xx,yy)

nparray_S = np.random.rand(xx,yy)
nparray_K = np.random.rand(xx,yy)

s = 0.12
r = 0

def bsvector():

    nparray_SoverK = nparray_S / nparray_K

    nparray_lnSoverK = np.log(nparray_SoverK)

    nparray_tproj = np.arange(1,721)

    nparray_tproj2d = nparray_tproj.reshape(720, 1)

    nparray_tproj2d = np.repeat(nparray_tproj2d, nparray_S.shape[1], axis = 1)

    nparray_d1topright = nparray_tproj2d / 12 * (r+(s**2)/2)
    nparray_d1bot = np.sqrt(nparray_tproj2d / 12) * s
    nparray_d2right = nparray_d1bot.copy()

    nparray_d1 = (nparray_lnSoverK + nparray_d1topright) / nparray_d1bot
    nparray_d2 = nparray_d1 - nparray_d2right

    nparray_Nnegd1 = norm.cdf(-nparray_d1)
    nparray_Nnegd2 = norm.cdf(-nparray_d2)

    nparray_Pleft = nparray_Nnegd2 * nparray_K
    nparray_Pright = nparray_Nnegd1 * nparray_S

    nparray_P = nparray_Pleft - nparray_Pright


starttime = datetime.now()
bsvector()
endtime = datetime.now()

print("Black-Scholes - Vector Approach")
print("Duration: ",endtime-starttime)

print("Start:    ", starttime.strftime("%H:%M:%S"))
print("End:      ", endtime.strftime("%H:%M:%S"))
The script accepts two command line arguments (xx and yy) which define the dimensions of the vector. If no arguments are provided, then it defaults to 720 and 5000 respectively. The script returns the dimensions of the vector used and the elapsed time of calculation. While the script has been designed to run as part of a Mo.net projection task, it can also be run standalone in Python or any Python development IDE (IDLE, PyCharm, etc).
Example Mo.net Project
The example Mo.net project can be downloaded directly from the Software Alliance website. It is available in the Additional Components section of the Customer Portal and is called PythonBlog2Project.mozip.
Open the example project:
- Download the mozip from the Software Alliance website
- Restore the mozip to a suitable location using Mo.net Model Development Studio
- Navigate to the Tasks view of the project and click on the RunPython group projection task to display the code as shown below:
Sub Run()

    '   This group projection task runs a vectorised Black Scholes Python script,
    '   captures the elapsed time of the calculation, and presents this back to the
    '   user in the progress window.

    '   Note: This sample requires Python v3.5 or later to be installed.
    '   We have assumed Python 3.9 is installed in c:\python39, but this can be
    '   changed below as required.

    '   create a process instance
    Dim p As System.Diagnostics.Process = New System.Diagnostics.Process

    '   define the dimensions of the vector to be created in the Python script
    Dim xx As Integer = 720, yy As Integer = 500

    '   allow redirection
    p.StartInfo.UseShellExecute = False

    '   allows us to capture the output from the script
    p.StartInfo.RedirectStandardOutput = True

    '   path / Python binary name
    p.StartInfo.FileName = "c:\python39\python.exe"

    '   arguments passed to Python script to define vector size
    p.StartInfo.Arguments = Project.Workspace & "Python\vector-black-scholes-standard-terms-with-parms.py " & xx & " " & yy

    '   start the process
    p.Start()

    '   capture the output from the script
    Dim output As String = p.StandardOutput.ReadToEnd()

    '   present the output in the Mo.net Progress Window
    Log.Progress(output)

End Sub
Tip: Before attempting to run the projection, make sure to edit the location of Python binary if needed, from C:\Python39 (see Line 24 above).
Run the Projection. You should see the following displayed in the Mo.net Progress Window.
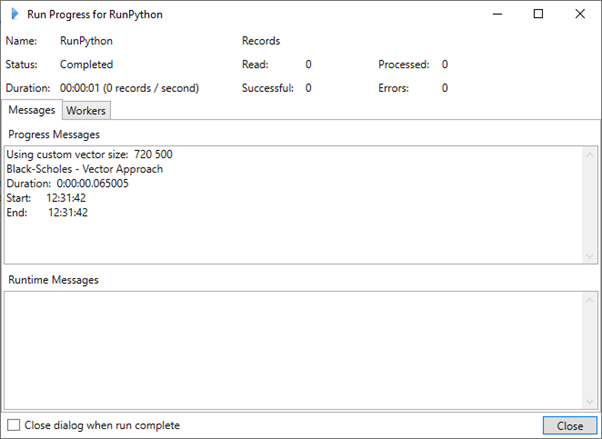
Now try changing the vector dimensions (xx and yy) in the Mo.net group projection task – to say 720 and 1000 respectively and rerun to make sure they are correctly passed to the Python script. I advise not changing yy to anything greater than 50,000 or you are likely to run out of memory.
What’s Going On?
The key elements of the Mo.net group projection code are as follows.
| Line | Commentary |
|---|---|
| 12 | Instantiate an instance of the standard .NET system.diagnostics.process object. This is akin to “shelling out” to a command prompt, but with significantly more flexibility. |
| 15 | Define the dimensions of the vector |
| 18-21 | Configure the process object to allow redirection of output |
| 24 | Define location of the Python binary |
| 27 | Define the arguments to pass to Python. This includes the script and the parameters, in this case the dimensions of the vector |
| 31 | Start the Python process |
| 34 | Capture the directed output from the Python process |
| 37 | Pass the output from the Python process to the Mo.net Progress Window |
Possible Enhancements
There are a number of obvious extensions to this basic projection task. For example, there is nothing to handle errors, either within the Mo.net projection code or the Python script. A first step might be to capture any errors raised by the Python script and show these in the Mo.net Progress Window. This can be done relatively easily by capturing additional properties of the process instance.
Another enhancement might be to expose the standard deviation and risk-free rate parameters in the Python script allowing them to be controlled by the Mo.net projection. This would require a subtle change to the Python logic to process another command line argument.
Finally, it might be useful to read the vector calculated by the Python script back into Mo.net as a table for downstream use in another task.
In the next article I will cover how to reverse the use case and call a Mo.net projection from Python.


Contact Us
Need a Mo.net licence? Get in touch with us today to discuss your modelling requirements.
Comments are closed.